Making reeds for musettes is a bit different from making modern bassoon or oboe reeds. Sure, it’s the same material and many actions can look familiar, but the main difference is that musette reeds are dry reeds. They do not come into contact with moisture from your breath, and do not like humidity changes at all. This completely changes the building process. Also, as musette is a bit of a niche instrument, none of the tools you need are available for purchase. You have to make them yourself, which can be a challenge even for experienced reed makers, or have them made for you at a high price. In the near future, we will have tools available for purchase, and offer semi-finished reeds as well.
In the meantime, you can take a look at the following step-by-step manual. In case you sort of know what you’re doing, and want a memory aid, look here. Each step has a link to a videoclip as well.

Musette Reed Making Manual
I’ve been making musette reeds for over 10 years now. The first attempts were horrible, and I did not like it at all. Over the years, I’ve learned to enjoy the process, and got a little better at it. There are many ways to make a good reed, but I’ll describe the method used by my master, Remy Dubois. He has been making musettes for over 40 years now, and 90% of professional musette players use his instruments. His musettes are exact copies of historic musettes, mostly made by Nicolas Chédeville, and the reeds are very close to the few surviving 18th century reeds we have access to. If you own a musette by another modern maker, you will have to use different dimensions. When I make a musette, I use plans by Remy, copies of his tools, and his reeds as a guideline, they should be interchangeable.
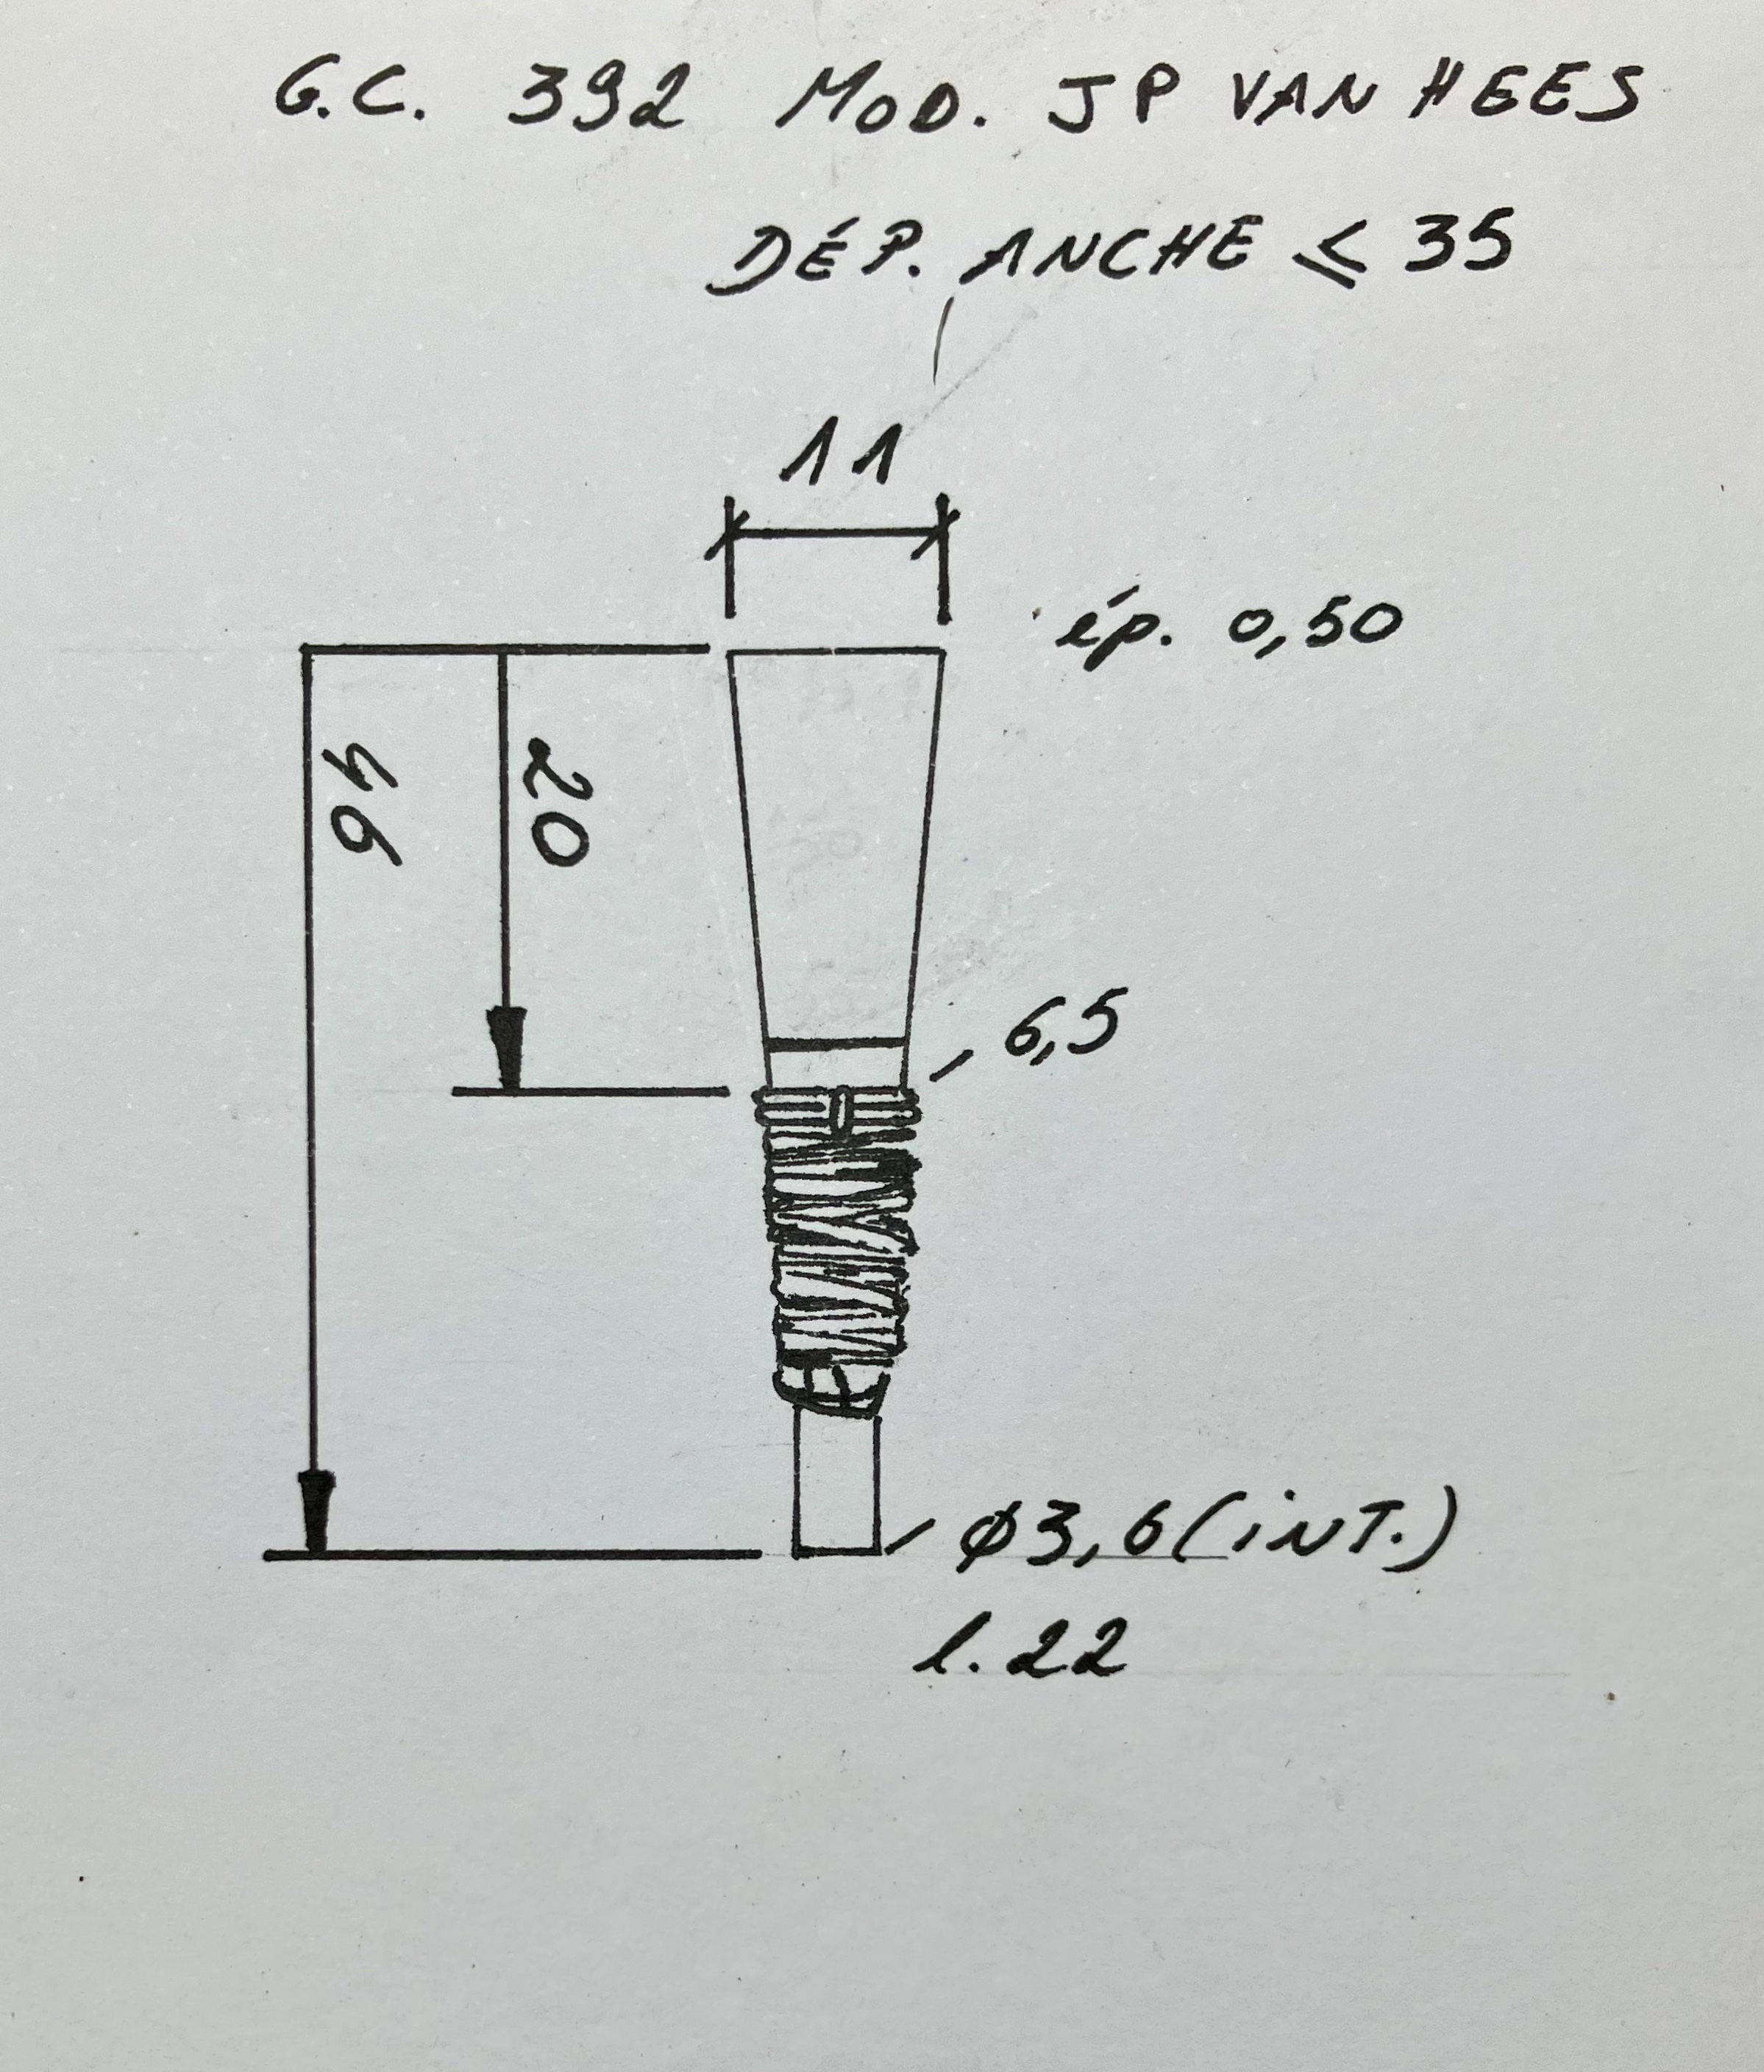
There is no such thing as The Standard reed that will always function. Reeds can be slightly longer, thinner, have a shorter staple, or a wider base… but here are two suggestions for G/C chanter reeds that I have used with good results: 392 pitch and 415 pitch.
The musette is a baroque instrument, but unlike other double reed instruments from that period, we don’t scrape our reeds on the inside. I tried that too, and it works, but I’m more used to this method. So here we go.
A few remarks before we start:
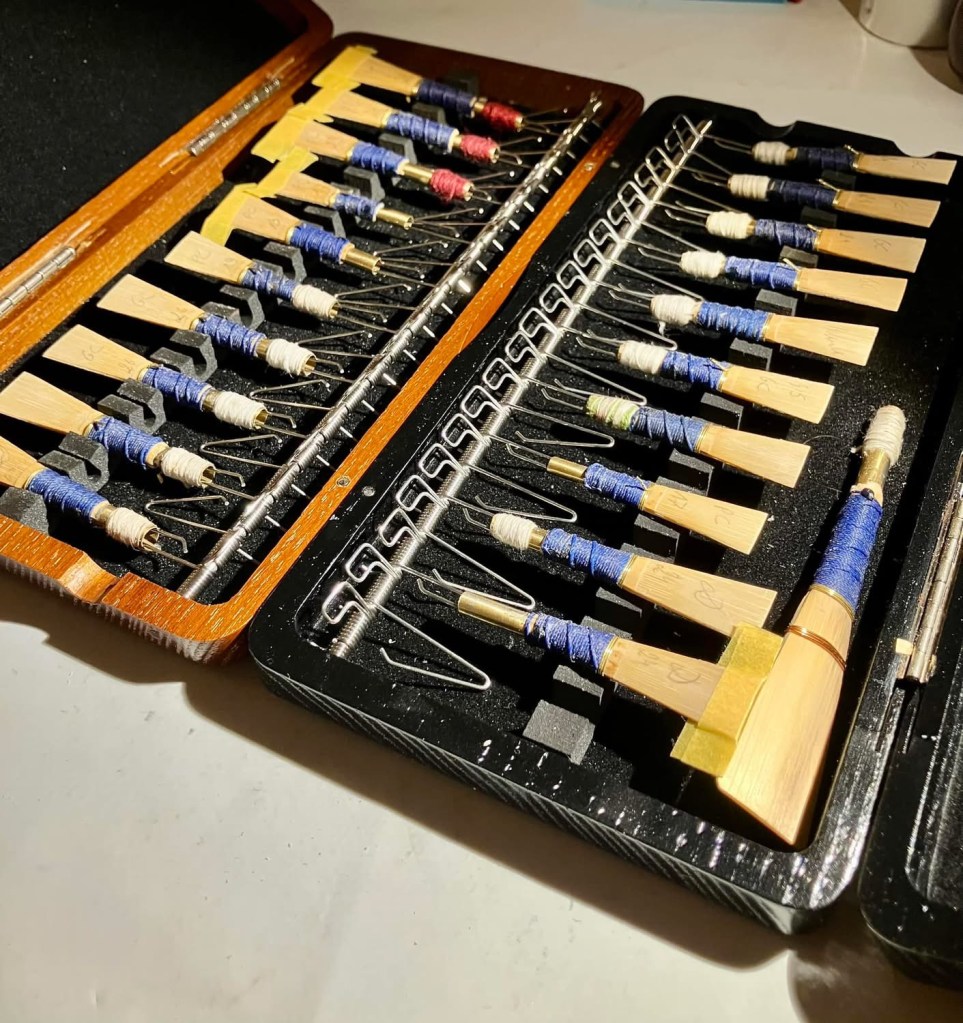
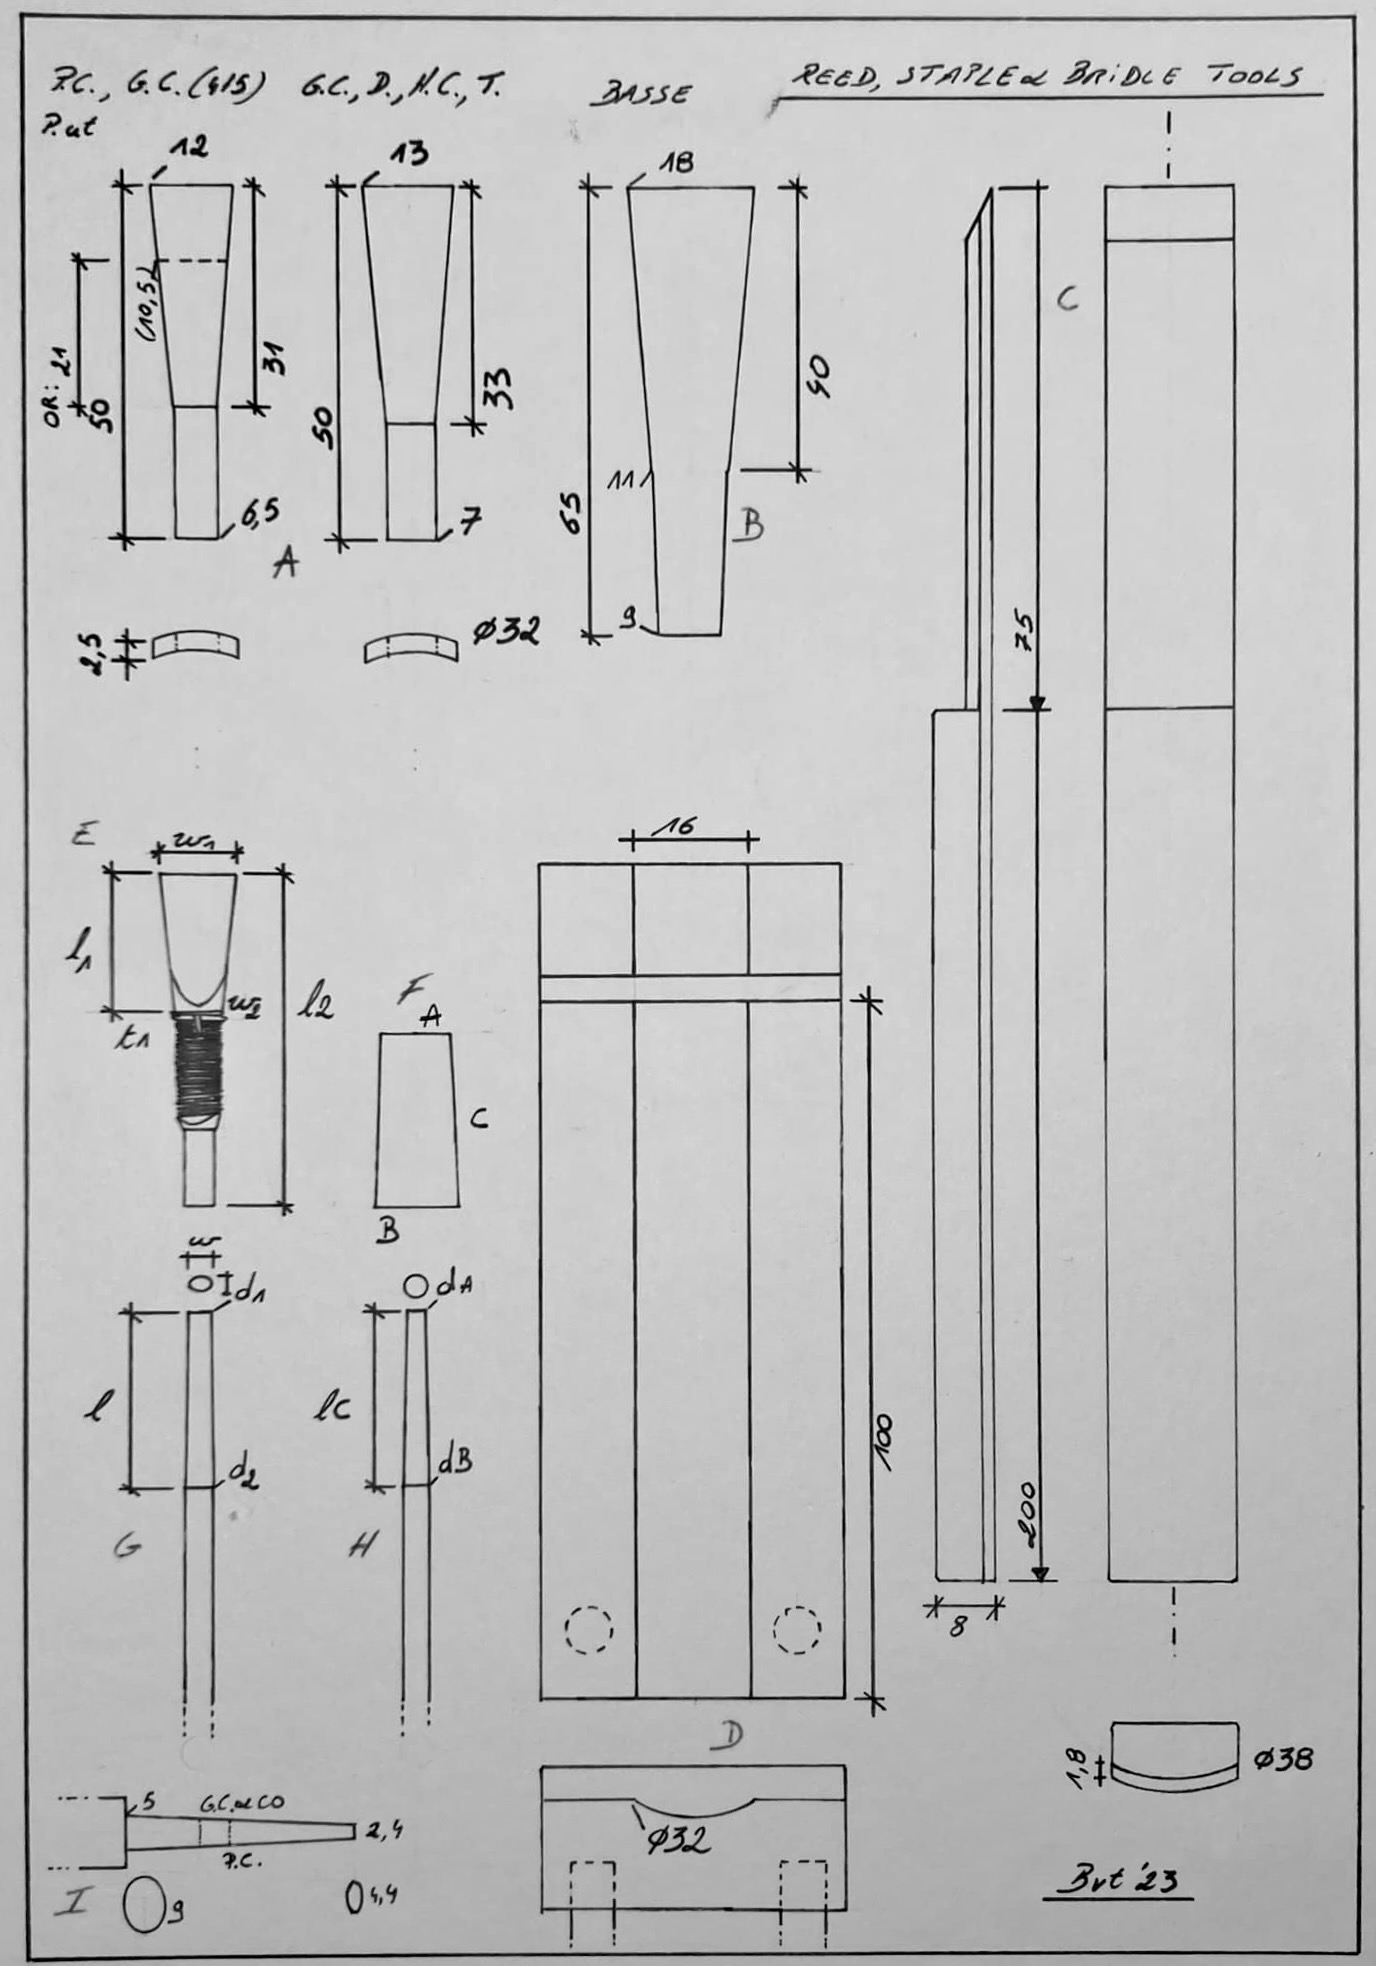
- You need a lot of tools. Few of those are readily available, but most can be made with a little bit of patience. You can also contact me (bartvantroyen@gmail.com) and see which ones I have for sale. If your tools are not precise and fit for the job, your chances of making a good reed are slim.
- I’ve added a list of tools, and technical drawings, and a video of the complete process. The tools you need for each step are marked in red. Just reading this manual will not answer all of your questions, but combined with the videos, most of the answers should be there.
- You need time and practice to make decent reeds. After a few hundred, it gets easier, I promise.
- Reeds are made of cane (around donax), a natural material. Some pieces will be too hard, or too soft, too irregular, or damaged by woodworm, or even have invisible defects… and won’t make a good reed. Use only the best pieces, you’ll be glad you did so later. I use French (contra-)bassoon cane with a 28-31 mm diameter.
- Symmetry is your highest goal. If you feel the sound of your reed is not totally free, but otherwise fine, look for small irregularities. Even 0,05 mm differences have an influence. Scrape those and it should feel like your handbrake is suddenly disengaged.
- A good musette reed can last for decades. Instead of ploughing this boring manual, you could just buy one and take good care of it. However, knowing how to make reeds also means knowing how to take care of them. There are up to 8 different double reeds in a musette, and they don’t always get along. Having a well-maintained instrument makes the musette community looks good, the opposite not so much. Have a seat, a cup of coffee and take one for the team!

The three stages of musette reed-making
It takes at least three days to make a finished reed. This includes drying time and around 100 minutes of work. A beginner might take longer, and will have to start over a few times.
Musette reeds are dry reeds, as you play them with a bellows. They take up moisture real quick, so you have to allow the reed to get back to a dry state before making too many changes. Unfortunately, this also means changes in relative humidity greatly affect your pitch and performance. Pure joy!
Now might be a good time to remind you never to exhale directly in your bag or play your chanters mouth-blown, the humid air would cause your reeds to deform in seconds.
1. Prepare and shape the cane
Take a 90 mm long piece of round cane, cut 15-17 mm wide sections, discard the uneven pieces or the ones with grey stripes where a leaf was growing.
Place the strips in the shooting block (bark side down) and gouge them to 0,72-0,70 mm in the middle. The sides will be slightly thinner. Tools C and D from the tool list.
You can use sanding paper to have a smoother finish. There are gouging machines available too, so you have a perfect result every time. Unfortunately those are very expensive.
Flip your gouged cane and make a 30 mm section in the middle of the cane. Here you have to remove the bark. Don’t overdo it, just scrape with your knife until the shiny part is gone. Mark the middle and cut the cane into two equally long parts. Removing the bark prevents cracking.
Determine the width of your reed at the tips (depending on the kind of reed you’re making), and cut both parts with a knife and the shapers. Tools A (grand and petit chalumeau, drones except bass) or B (bass reed).
Mark the vibrating length of your reed on each part, and add a second mark 2 mm closer to the tip. The first mark is where the bridle will be, and the second mark is where we will start scraping from the outside of the reed. Do not remove the bark in between the marks. You will need it to provide stability. Make sure to be as precise and parallel as possible, on both parts.
Now we have to reduce the thickness of the cane, starting at the second mark and working towards the tip. You can use a file, sanding paper or a knife or all of those combined. You should end up with a thickness of 0.52 mm just above the second mark, 0.50 in the middle and 0.45 at the tip, measured in the middle of the cane. The corners at the tip should have a thickness of 0.40 mm.
Cut both parts of your future reed to length, leaving one side 2 mm longer than the other. For a grand chalumeau reed, I recommend 35 and 37 mm.
Score your cane from the bottom to 2 mm below the first mark (crosshatch or straight lines, take your pick), part of the way through. This also helps preventing cracks when inserting the staple.
Bevel the inside over the last few mm towards the bottom, bevel the sides of the straight part and cut the corners at the butt of the cane. This can help seal the reed around the staple.
Now it’s time to soak the cane. Do not just put it in a glass of water, instead put both pieces in your mouth and don’t let the moisture pass the first mark. Do this for 15-20 minutes.
In the meantime, prepare everything you need to tie the reed onto the staple. To make the bridle, you need 2 pieces of 9 cm long brass wire (0.35 mm thick). Cut two 5 cm long pieces to persuade your cane to take the shape of the staple. Make a temporary bridle using one of the longer wires and put aside. Tool I.
Cut 60 cm of polyester thread, and wax it. Tie one end to the table.
Heat up the forming pin and check the dimensions of your staple. Tool G.
Watch the YouTube clip here.
2. Tie the reed onto the staple
Take the two parts of cane out or your mouth, place them on top of each other (concave sides facing each other) and slide the temporary brilde over the bottom towards the first mark. If the bridle is too loose, make another one. It needs to be snug, but not impossible to move.
Insert the now hot forming pin. You will see the reed drying out as it enters. The steam will help shape your reed and prevent cracking. Stop 4-5 mm below the bridle. Remove the forming pin and insert the staple. Use calipers to put the staple in place, and stop at the correct length for the type of reed you’re making. Don’t go too fast, you can stop and tighten the temporary bridle if needed. If you see a crack forming, use superglue and tighten the bridle. If the crack does not extend past the bridle, there should not be a problem. If it does, start again.
Once your reed has the desired length, use the two 5 mm brass wires to tie the cane around the staple. One at the bottom and one at the end of the staple. Gradually tighten both of them and the bridle until everything is snug and aligned.
Place the reed on the forming pin and wrap your reed with the waxed polyester thread. Start at the bottom and work your way up. Remove both of the shorter brass wires as you reach them. Finish off with a knot and burn both ends of the thread. Tool G.
Remove the temporary bridle for a new one. The bridle should touch the polyester thread on one side, and just cover the first mark on the other side, leaving 2 mm of bark before the scraping starts. This determines your vibrating length, and pitch.
You can remove the bottom of the cane that surpasses the polyester thread. A good looking reed might not be a better reed per se, but reed making is a very precise job, and that should be reflected in the way they look.
The final step at this stage would be to scrape a bit of the entire length of the reed. Do not touch the 2 mm with the bark! Put the reed in your mouth, and suck on the staple (don’t blow!). If you can produce a sound, your work is done for now. Take a piece of tape (quality masking tape for delicate surfaces, that’s easier to remove) and cover the tip of the reed to close it. It is far easier to convince a reed to open a little, than to close. Put aside and wait at least 24 hours before you continue. This allows your reed to dry, and take the tape of the staple.
You should now consider making a few more. Succes is not only depending on how good your reed making skills are, but also on the unpredictable intrinsic qualities of the cane itself.
Watch the YouTube clip here.
3. Scrape the reed
The next day (or a bit later, sometimes I wait a few weeks without noticeable problems), you can carefully remove the masking tape and start scraping your reed. For me, this is a good time to wrap the bottom part of the staple with fine cotton thread. Apply a bit of glue first (Bison kit universal or something similar) and then make a slightly tapered cone. This is an important step, as the depth of the reed has a big influence on the pitch, and a reed that’s not firmly seated in the chanter will be very unreliable. There’s no need to use waxed thread.
Check the bridle, it should be snug, and might be loose as the reed shrunk a little overnight. Tighten if needed. If you encounter drastic changes in pitch when you change your playing pressure, check your bridle, it’s probably broken or needs a twist. This is the number one problem with musette reeds, caused by a drop in humidity.
The scraping is done in three stages, first we take a bit of the entire length of the reed. Try to remove an equal amount from every side, left, right and in the middle. This first scraping will make your reed sound less like a bagpipe reed, and more like a musette reed. The second scraping is situated at the upper part of the reed. Diminish the thickness by starting in the middle and working towards the corners. By scraping at an angle you get a more even result. Scraping here makes your reed easier to play. Ideally, a grand chalumeau reed measures 0.22 mm at the middle of the tip, 0.20 at the corners and 0.35 mm about 9mm from the tip. In between those two points, removing material will result in a reed that is easier to play. Until it is too easy and stops playing. Be gentle and play a little before going too far. Both sides need to be as symmetrical as possible. Check the aperture of your reed, it should look like the eye of a cat. When you try to close the reed with your fingertips, you should be able to see where it needs more pressure to close. Those spots are too thick, and should be scraped a bit more.
The third scraping is situated just above the second mark. Without touching the bark, remove a bit of material at the sides to close the tip of the reed. This makes it easier to play, without weakening your reed too much.
Now you can play your reed, and let it rest for a few days. Try it, measure everything and scrape gently where you find irregularities.
Ideally, you can place a ruler in the middle of your finished reed, from the staple towards the tips, and you would have one continuos line. No sudden drops or thicker zones. Remy calls this ‘un grattage régulier’ or ‘continuous scraping’. Hold your reed next to a desk lamp, you want a dark zone at the bottom, and gradually lighter zones towards the tips. Dark spots in the light zones need to be adjusted. Use this picture as a reference.
You can now try your reed, without being bothered by the pitch. In case of a chalumeau reed, just play it for a while, and make tiny adjustments when needed. Don’t rush things, take your time as you cannot add material, only remove it once.
Once you’re happy with the sound and playability, try and get it to the right pitch.
If it’s flat, and sounds a bit bland, shorten it by cutting a tiny bit of the tips, less than 1 mm if possible. This has it’s limits, a short reed is very aggressive, but will revive your reed and give it more punch.
If everything plays and feels fine, but you’re still flat, file the bottom of the staple, remove the burr and make sure your reed sits a bit deeper in the chanter. One mm will bring it up by ca. 15 cents.
Simply closing or opening the reed will alter the pitch too (less aperture means sharper, but less volume and pressure, opening the reed has the opposite effect).
Prolonging the thinnest part at the tips of the reed makes your reed slightly flat, and it will also play with less pressure.
Adding a bit more thread at the bottom of the staple, prolongs the air column, and the pitch will go down.
Scraping the sides at the middle too much will destroy your reed in no time. You need some material to provide stability.
Scraping a thinner part in between the staple and the middle (a ‘window’), can help if you have problems in the higher register. This is a ‘last resort’ solution.
Sometimes the high 7th note on a grand chalumeau (high f on a g chanter) makes a hissing sound. Scraping a tiny amount just below the tips, in the middle of the reed will fix this.

